How to Use an Image as a Layer Mask and Add Depth to Your Designs

Two of the most important resources a designer can have are textures and vectors. There are plenty of ways to use them together, but few as are simple or effective as using a photo-based texture as a layer mask.
Learn how to take a regular old texture and put it to use in a Layer Mask to add depth and authenticity to any design.
- Software Used: Photoshop CC
- Skill Level: Intermediate
- Time to Complete: 60 Minutes
What We'll Be Creating

Step 1
Create a new document at 1920 x 1280 pixels. Place your background texture into the document. We're using a wood background from our Wood Textures Pack 3.
Sample one of the midtone colors from your background using the Eye Dropper tool, then create a Solid Color fill layer on top of your background using the color you just sampled. Set the Opacity of this layer to around 50%. The purpose of this layer is to tone down the contrast of our background image, while still leaving an obvious texture.
Note: A solid color fill layer is created half empty, half filled circle icon at the bottom of the Layers palette, and allows you to edit the color easily by double clicking the layer thumbnail.

Step 2
Create a rounded rectangle that is 1280 x 720 pixels with a corner radius of 25px using the color #AAC7D3. Make sure you have Shape selected in the top toolbar before you create your shape so that it is created as a vector shape.
Using the Add Anchor Point Tool — click and hold on the Pen Tool — add a point in the top center and bottom center of your rounded rectangle.
Use the Direct Selection tool (by pressing A) to select and move each point up or down about 50 pixels.

Step 3
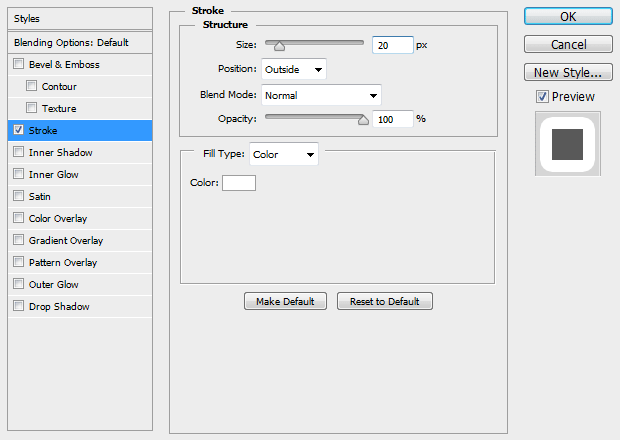
Double click your rounded rectangle in the Layers palette and apply the following Layer Style settings to give it an outer stroke.

Step 4
Create your main text using the color #425463. We're using the font FT Anchor Yard.

Step 5
Create some smaller text at the top of your sign using the color #425463. We're using the font Portmanteau.
Note: You can create bullets by holding Alt and typing 0-1-4-9, making sure to use the keypad on the right side of your keyboard.
With your text layer and the Type tool still selected, click the Warped Text button in the top toolbar, and give it an Arc. Set the mode to Horizontal and the Bend to +7%.

Step 6
Create another line of text at the bottom, and this time give it a -7% bend to warp it to match the bottom curve of your main shape.

Step 7
The next part might take some tweaking to get right.
Using the pen tool, draw a simple wave shape, making sure Shape is selected in the top toolbar. Before drawing your shape, set the Fill in the top toolbar to empty, and the Stroke to a solid, 3pt white line.
Duplicate your wave shape and move it horizontally to line it up with the original. You may need to tweak some of the points to get them to line up properly.

Once you have a single wave shape that can seamlessly be repeated, create multiple duplicates and move them horizontally to create a horiztonal divider.

Step 8
Move the wave shapes into a Layer Group, duplicate the Layer Group, and move your horiztonal wave divider so you have one on both the top and the bottom of your main text.

Step 9
Repeating the same process as before, draw another wave shape going the opposite direction, but this time give it a black fill and no stroke.
Make it repeat horizontally and move it to the bottom of your canvas.
Set the Fill to 10% in the Layers palette, and change the Blend Mode to Linear Burn. This will act as a decorative border at the bottom of our graphic.

Step 10
Create a new Layer Group, and move all your layers in that group except the background texture and the Solid Color fill layer.
Add a Layer Mask to the new Layer Group.
Right click your background texture and select Duplicate Layer. Choose New as the destination and hit OK.
Click Image > Image Rotation > 180* to rotate your image 180 degrees.
Add a Black and White adjustment layer, then add a Levels adjustment layer. Apply the follow settings to the Levels adjustment layer.

Step 11
Right click one of the layers in the Layers palette and select Flatten Image.
Press CTRL + A to select your entire canvas and CTRL + C to copy your new black and white texture.
Back in your original document, ALT + Click the Layer Mask you added to your Layer Group in the Layers palette to make it visible, and then press CTRL + V to paste your black and white texture into the Layer Mask.
ALT + Click the Layer Mask again to hide it.

Step 11
Creave a Curves adjustment layer on top of everything else, and move the center of the curve down and the right. Give it a Layer Mask if it doesn't have one already and with black, paint using a large, soft brush on the center portion of the mask to limit the Curves adjustment to just the corners of your canvas. This will create a vignette.

Final Image
I'll admit, most of the steps we took above were creating the design of our fake seafood restaurant, but you can see how quickly adding the texture went.
You can also grab Realistic Noise Textures Volume 1, which are super high resolution, preprocessed, and ready to copy/paste to give your work all kinds of realistic texture.
These techniques can be used to create all kinds of cool signs and peeling paint effects. What did you come up with?
Related Items
Grab a PanoPass now and get instant access to all these items and much more.


