Rusty Vintage Tin Sign in Photoshop

If you've ever watched American Pickers, you know that vintage tin signs are a hot commodity. Lucky for us, we can recreate this retro effect in Photoshop — without the fear of a possible tetanus shot.
- Software Used: Photoshop CS6
- Skill Level: Intermediate
- Time to Complete: 60-90 Minutes
What We'll Be Creating

Step 1
Start with a new document that is 1600 x 1280 pixels at 72 DPI in RGB color mode.
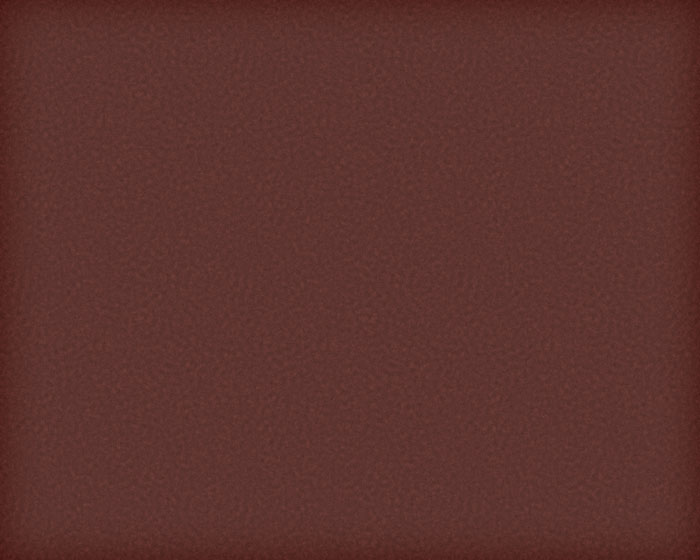
First we'll create the base rust layer that will eventually show through our design.
Unlock your background layer and fill it with a dark, brick red color like #442623.
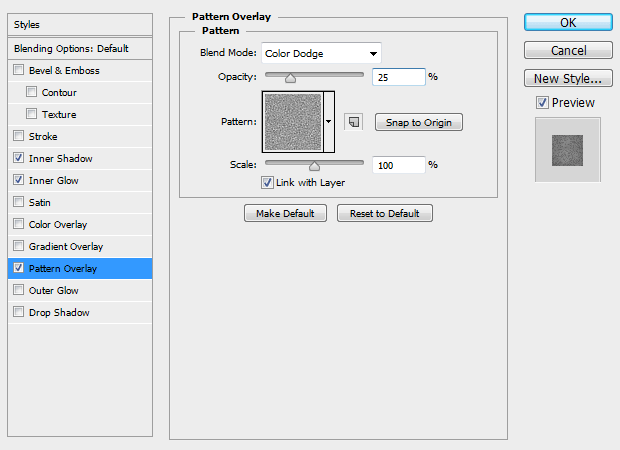
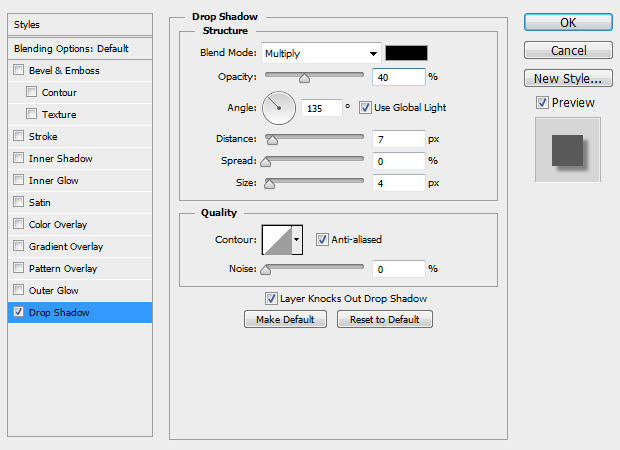
Apply the following layer style settings.
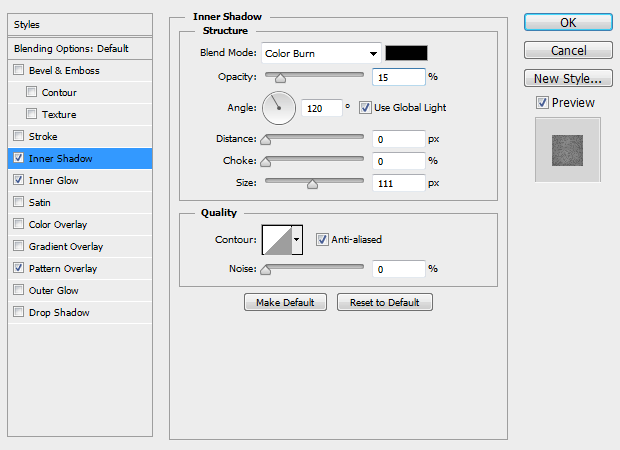
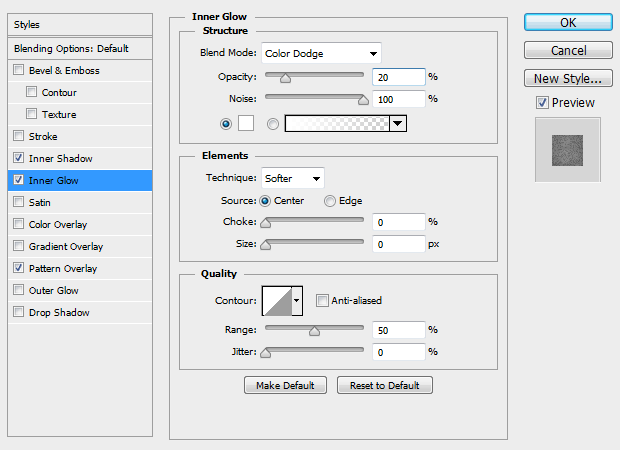
The pattern used is the first one named Rough, in Photoshop's included "Erodible Textures" Pattern library.
You should have something similar to the image below.
Step 2
Next, we'll create the actual artwork for our sign.
Draw 3 boxes using a mostly neutral, muted color palette. We used #E3C69C (tan), #B2656A (pink), and #7DABA2 (teal).
You should have something similar to the image below.

Step 3
Add your title and tagline text using a vintage looking script font. We used the font Coffee Service, which is a paid font, but you can use something similar, and free, from one of the script categories at dafont.com.
Our title font color is #493F35 and the tagline text is #333333.
You should have something similar to the image below.

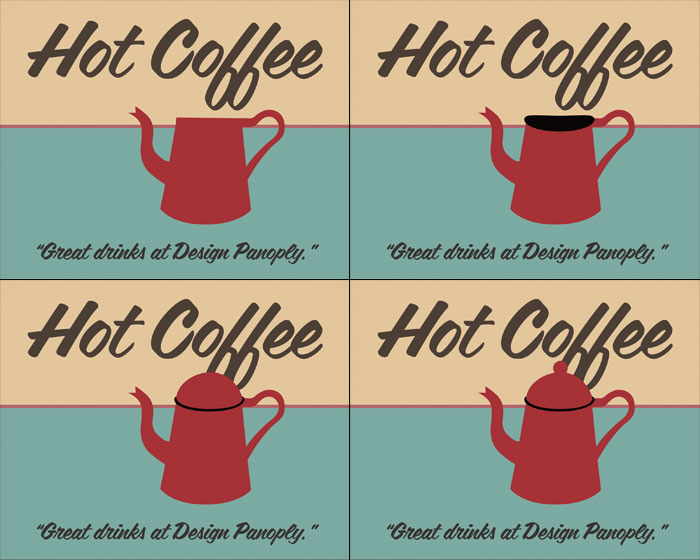
Step 4
Now we need to draw our coffee pot shape using the Pen tool. To keep it as editable as possible, we'll be drawing each shape on a separate layer.
The coffee pot is a total of 4 layers: the body, the black rubber seal, the lid, and the round nub on top.
You can see the progression of how it was drawn below.
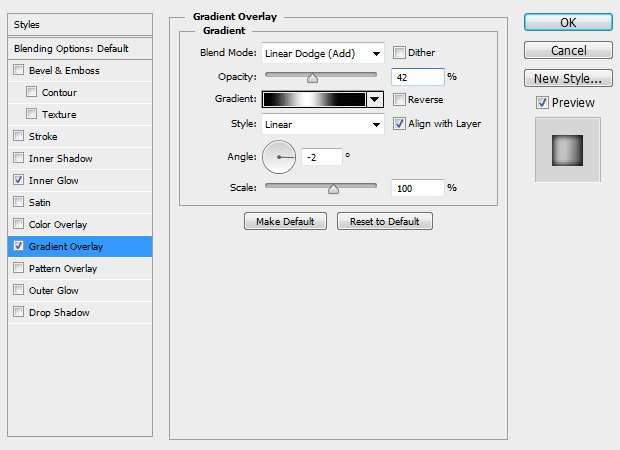
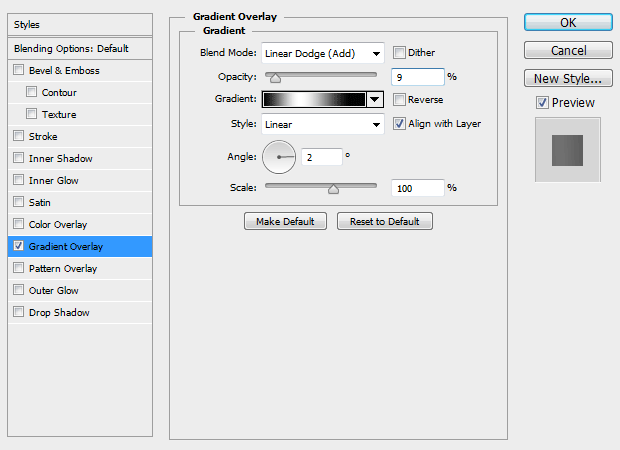
Step 5
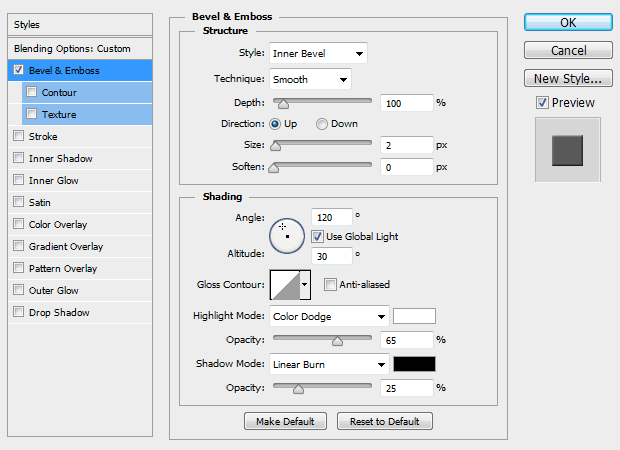
To give our pot a little depth, well give it a subtle highlight. Apply the following layer style settings to the body shape of your pot.
You may need to adjust the size and position of your gradient to get the best effect.
You should have something similar to the image below.

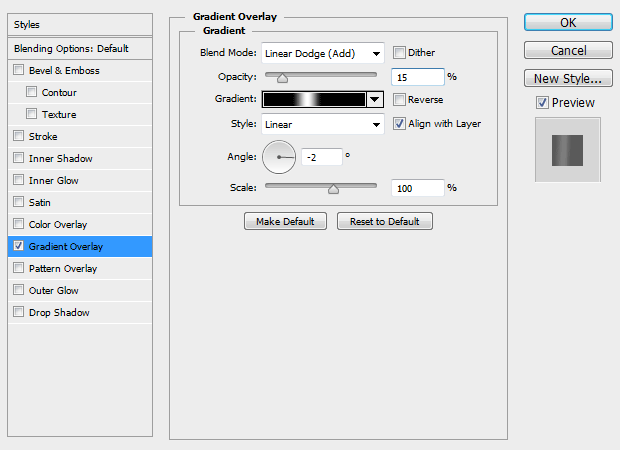
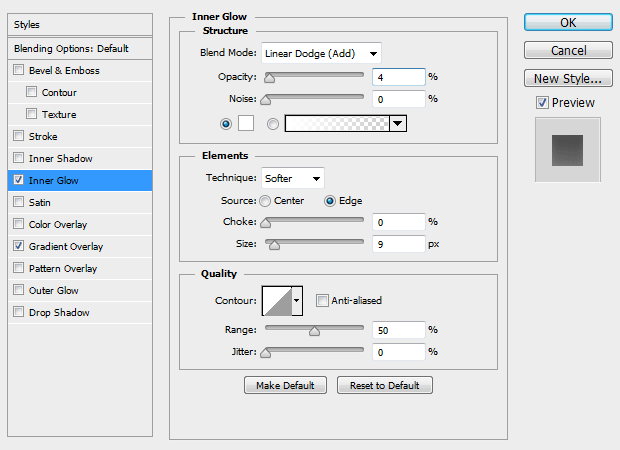
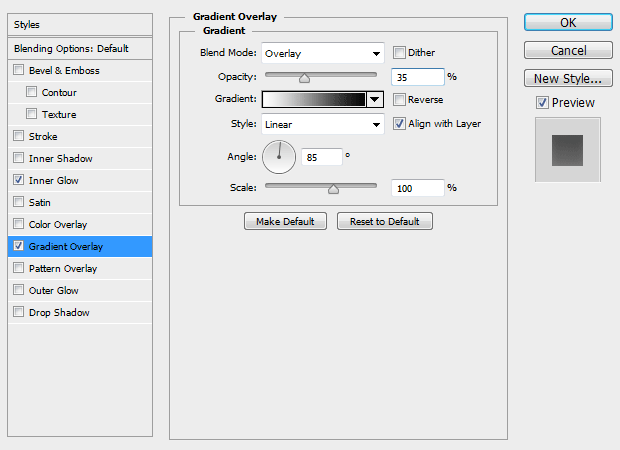
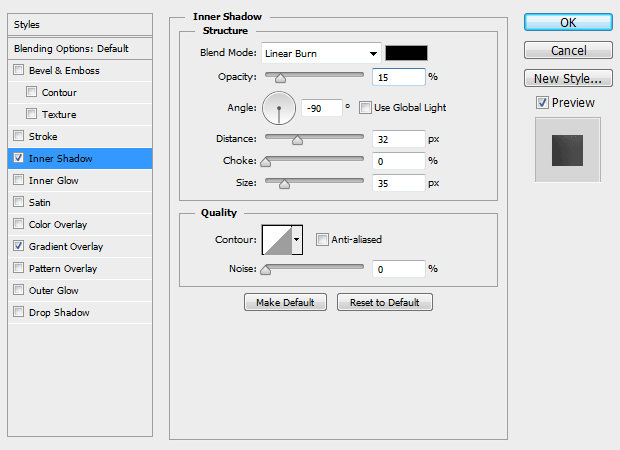
Step 6
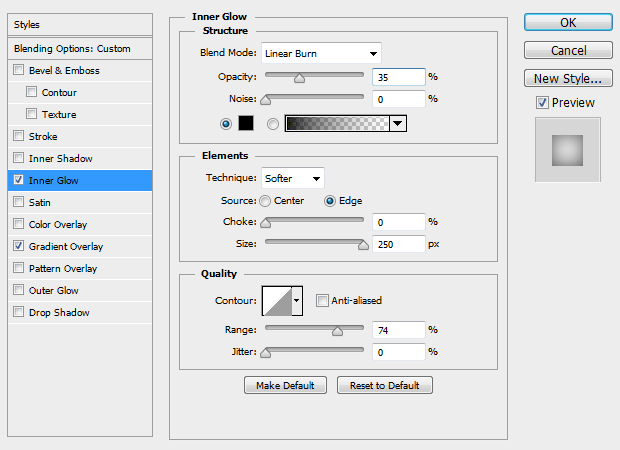
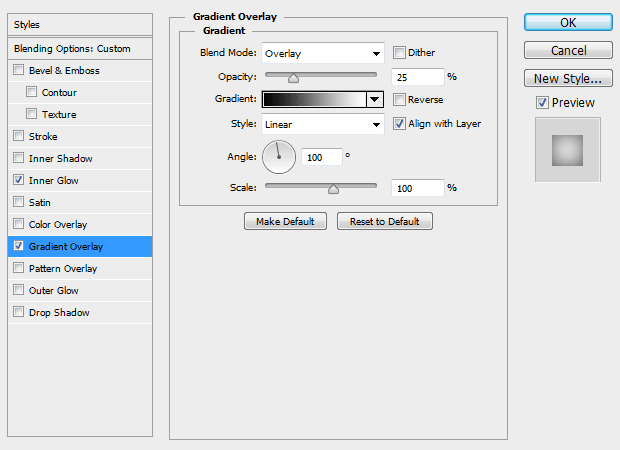
The black seal uses different gradient settings, and an inner glow for more depth. Apply the following layer style settings to the black seal shape.

You should have something similar to the image below.

Step 6
Apply the following layer style settings to both the pot lid and round nub. By using a radial gradient, we can add some depth to our round shapes.
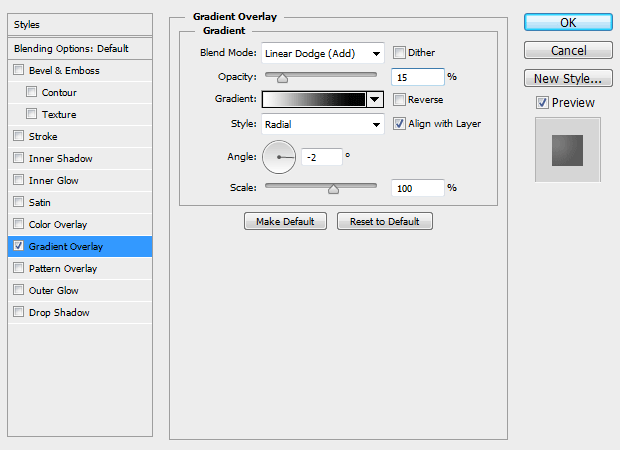
You should have something similar to the image below.

Step 7
Now we'll create the coffee mug using the same drawing techniques we did for the pot.
Using the pen tool, draw the main outline shape of your mug using the color #F8EBD5.
Remember, while using the Pen tool, you'll draw the initial mug outline as a Shape (set in Photoshop's top menu area). You'll then draw the negative space for the handle as a Path instead of a Shape. Then change the Path Operation (also in the top menu area) to Subtract Front Shape.
You can see where to select Shape, Path, and Subtract Front Shape below.

Apply the follow layer style settings.
You should have something similar to the image below.

Step 8
Draw two oval shapes, each on a separate layer, with the color #F8EBD5. The image below uses different colors just so you can see where the shapes are.

Apply the follow layer style settings to the larger oval.
Apply the follow layer style settings to the smaller oval.
You should have something similar to the image below.

Step 9
Creating the liquid coffee can be a little tricky if you've never used the Pen tool, or depending on which version of Photoshop you have as some things have changed over the years.
Duplicate the small oval shape we just created, clear the layer styles, and change the color to #4C3E35. Select the oval shape using the Direct Selection Tool (A). Copy and paste it, then move it down about 50 pixels. Then set the Path Operation to Intersect Shape Areas.
You can see how the shapes overlap, and should have something similar to the image below.

Step 10
Now an easy step.
Draw a smooth, steam shape in the color #B5B5B5 and place it above your coffee.
You should have something similar to the image below.

Step 11
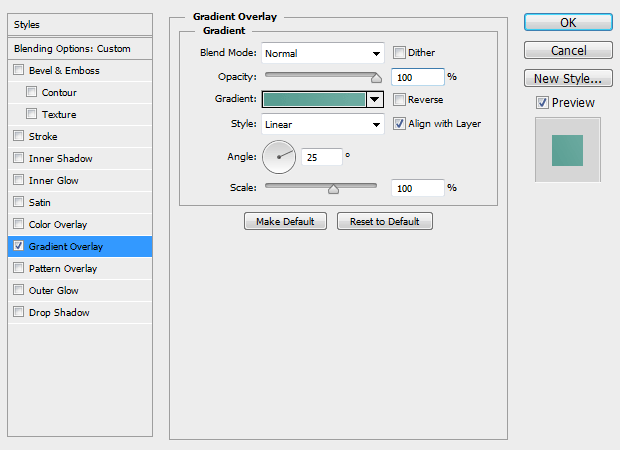
Draw two separate shapes for the shadows of the mug and pot, and place those layers just below your mug and pot layers.
Set the Fill for each to 0% in the Layers palette and apply the follow layer style settings to both.
The colors in the gradient are #579C91 and #6EACA2.
Create a new layer between the mug and pot and draw the shadow that the mug casts on the pot using black. Set the Opacity to 7% in the Layers palette.
You should have something similar to the image below.

Step 12
Our design is now complete! Here is where the real magic happens.
Create a new group in the Layers palette and move all your other layers except the bottom rust layer inside.
Select the new group, and click Layer > Layer Mask > Reveal All. This will create a Layer Mask for the entire group.
The mask is white, so whatever we paint into it as black will be transparent and show the rust underneath.
You'll need some type of grunge and/or artistic brushes for this next part.
We used our Torn Paper Edges Brush Pack 1 and our Watercolor Strokes Brush Pack 1, which work perfectly for this effect.
Using black, "stamp" or draw your brush along the bottom edge of the Layer Mask to make our artwork transparent and show the rust underneath.
You should have something similar to the image below.

Step 13
Using various brushes, continue this process and draw more black along the outsides of the image, rounding off the corners for a more realistic effect. Draw some black flecks across different areas of the image as well.
You should have something similar to the image below.

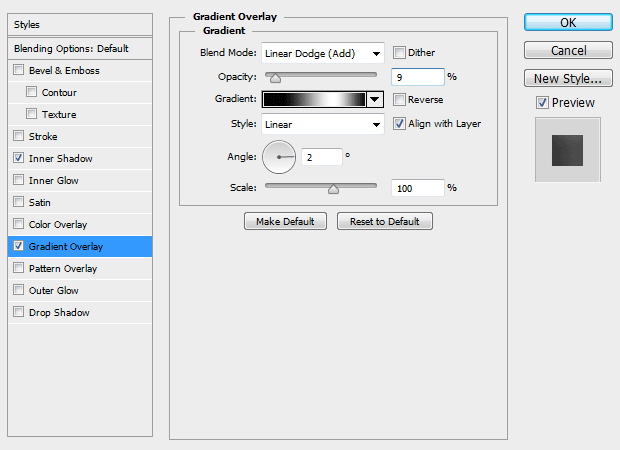
Step 14
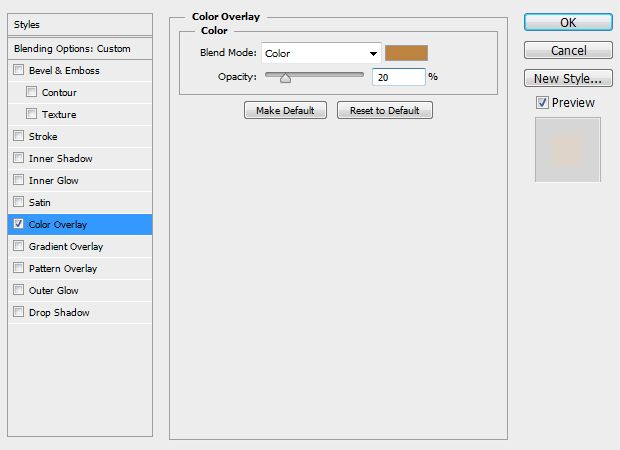
Create a new layer above this group and fill it with any color. Set the Fill to 0% in the Layers palette and apply the follow layer style settings using the color #BD8440. This will even out the tones across the entire image.
You should have something similar to the image below.

Step 15
Next you'll need a grunge texture. We used one from our Grunge Texture Pack 1.
Paste it into your document and set the Blend Mode to Overlay in the Layers palette.
You should have something similar to the image below.

Step 16
Create a new Group in the Layers palette, and move all layers and groups inside. With this new Group selected, click Layer > Vector Mask > Reveal All.
Click your new vector mask, select the Rounded Rectangle Tool (U), set the tool mode to Path, and click your canvas. Create a rounded rectangle that is the size of the canvas (1600 x 1280) with a 25px radius. Align this shape to your canvas and you'll now see the edges of our sign are rounded off.
Use the Elipse Tool (U), again in Path mode, but set to Subtract Front Shape, and draw small circles in the corners and at the middle edge of the top and bottom.
Apply the following layer style settings to the Group to add some subtle depth to the sign.
You should have something similar to the image below.

Step 17
Your sign is now complete!
Select your entire canvas (CTRL + A) and Copy Merged (SHIFT + CTRL + C). Create a new document, preferably the same size as our original. Paste the sign in (CTRL + V) and resize it to cover about 70% of the new document.
Apply the following layer style settings.
Paste in the background of your choice. We used a texture from our Wood Textures Pack 2.
You should have something similar to the image below.

Step 18
Create one final layer above the rest and fill it with any color. Set the Fill to 0% in the Layers palette and apply the following layer style settings for some lighting effects.
Final Image
Some final brigthness adjustments and that's it! You can easily change the text and artwork of your sign and copy/paste it into new designs.
These techniques can be used to create all kinds of cool signs and peeling paint effects. What did you come up with?
Related Items
Grab a PanoPass now and get instant access to all these items and much more.


